New WordPress Plugin
Overview
Install, configure, and use the Siteimprove WordPress Plugin with the New Plugin Experience. This article covers pre-installation requirements, installation, configuration, optional Prepublish setup, and links to plugin usage guides.
Summary
This article applies to version 2.0.0 and after of the WordPress CMS Plugin should you choose to opt-in to use 'latest experience' under the plugin configurations. If you want to opt-out of the latest plugin experience follow this guide to opt out: How to Disable New CMS Plugin UI. Then you will be using the Old Plugin Experience and need to follow the Old WordPress Plugin and How to navigate the old CMS Plugin.
The Siteimprove CMS plugin is an overlay that, after installation, appears in your CMS platform informing you about issues related to the site/page that you are working on.
The Siteimprove WordPress plugin is the CMS Plugin used specifically with WordPress. The plugin works like a small version of the Siteimprove Intelligence Platform and shows information about published/live pages that are available to the Siteimprove crawler.
The Siteimprove WordPress plugin has the added advantage of Siteimprove’s Prepublish check functionality which allows you to check for certain content issues before publishing.
Note: You'll need a Siteimprove subscription to Prepublish in order to use the feature. Contact Siteimprove if you have any questions regarding your subscription.
Before You Begin
Prerequisites for Installation
There are several things you need to and can do ahead of installing the plugin to ensure that the plugin is installed and configured more easily.
Ensure that You Have the Proper Resources to Set Up the Plugin
You will need to ensure that someone has Account Owner level access to the Siteimprove platform. They will need to be the first to login to the plugin via the overlay once installed to approve the terms and conditions of the plugin.
It is recommended that you have resources on your end that have expertise or training with the Siteimprove Platform and, more importantly, expertise with the WordPress CMS platform at the Admin level. Siteimprove doesn’t have the resources to walk you through the steps of installation and configuration of the plugin.
Ensure You Are Scanning the Site You Are Installing the Plugin on in the Siteimprove Platform
Make sure that the CMS site you are installing the plugin on is set up as a site being scanned in the Siteimprove platform, and it is not a local environment (i.e. an installation specific to your computer that doesn't have a published equivalent). Even if you plan to use the plugin mainly for Prepublish checks or you are just testing the plugin, you still need to install the standard plugin that checks against published content that is scanned in the Siteimprove platform. If the site is not being scanned, you can add the site to be scanned by following these steps: Adding a Site (Tips & Tricks). You will need to scan the published (live) pages and not the authoring (editing) pages.
If you want to test the plugin on a test environment first, please reference this article for steps to do so: How to test the Siteimprove CMS Plugins. For testing the plugin, it is best practice to scan published pages for a non-production site (for example, a QA, UAT, DEV, or Stage site). Do not test on a local environment for which the live published version of the pages cannot be crawled, as it will not be a good test of the plugin functionality. There are options to scan non-public sites, like allowing the IPs and User Agents used by Siteimprove or setting up a login site outlined here: Can Siteimprove crawl an intranet and other non-public sites?
Ensure That the Plugin Is Not Blocked (Optional)
This is marked as optional, as you may want to install the plugin first and then, if you run into issues, ensure that the plugin is not blocked by the things mentioned below. If you want to head things off and ensure no issues arise ahead of installation, though it may be good to take this into consideration ahead of time.
If you have network firewalls, Content Security Policies (CSP), Cross-origin resource sharing (CORS) policies, or other programs used with the site/browser that could block network requests made by the plugin, it is a good idea to ensure that the domains used by the plugin are not blocked.
Incognito browser windows, browser extensions that block ads or pop-ups, and cookie-blocking browser extensions or settings are all things that can block the plugin from working as expected as well. The plugin requires cookies for the login, and it could be seen as an ad-like pop-up, so it is best to ensure these things are not used with the plugin, or you may encounter issues with the plugin.
Domains to Allow for the CMS Plugin
Overall (if wildcards are allowed):
- *.siteimprove.com
- *.siteimproveanalytics.com
- *.siteimprove.net
- *.siteimproveanalytics.io
More Specific:
- api.siteimprove.com
- id.siteimprove.com
- identity.siteimprove.com
- sso2.siteimprove.com
- my2.siteimprove.com
- help.siteimprove.com
- cdn.siteimprove.net
- api.eu.siteimprove.com (EU Datacenter)
- id.eu.siteimprove.com (EU Datacenter)
- ap.eu.siteimprove.com (EU Datacenter)
- contentassistant.eu.siteimprove.com (EU Datacenter)
- api.us.siteimprove.com (US Datacenter)
- id.us.siteimprove.com (US Datacenter)
- my2.us.siteimprove.com (US Datacenter)
- contentassistant.us.siteimprove.com (US Datacenter)
- ap.us.siteimprove.com (US Datacenter)
If using specific URLs, you should include the URLs that don't note which data center, and also the ones listed for the corresponding data center you are on.
If Using the Prepublish Feature, Create an API Key (Optional)
Follow the steps here: How to connect to the Siteimprove API, to set up an API key. This API key will be used in the installation process to set up the Prepublish feature. The user you set up the API key with will need access to the site you are installing the plugin on, and also should ideally have Admin or Account Owner level access in the Siteimprove platform.
Note: It is best practice to set up a user account that is generic and not user-specific, like one called “Siteimprove User” for example, so that specific user changes don’t impact the plugin connection. See: How do I add a user? for how to set up the Siteimprove user portion of this. A user like this can be helpful to have set up to be used with other integrations as well, for the same reason. It is up to your organization to create and manage this user within your CMS or organization.
How to Install the WordPress Plugin
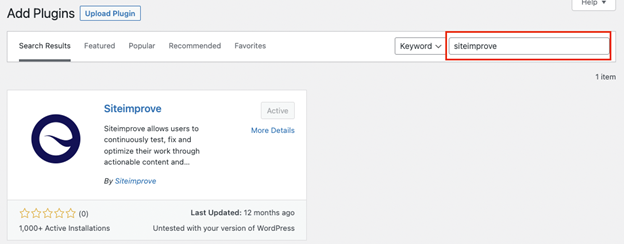
- Under the 'Plugins' menu item select 'Add New.'

- Then the installation can be done in one of the following ways:
- By searching for the plugin under the search box on the 'Add Plugins' page and selecting the 'Install Now' button.
- By searching for the plugin under the search box on the 'Add Plugins' page and selecting the 'Install Now' button.
- Install it by selecting the 'Upload Plugin' button and then uploading the plugin file you can download from the WordPress Plugin Marketing Site page or here: https://wordpress.org/plugins/siteimprove/.

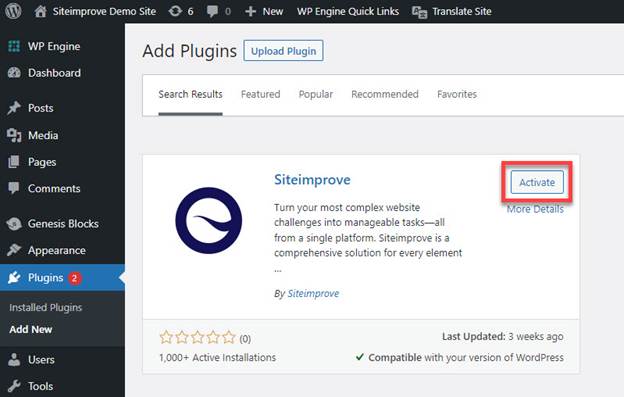
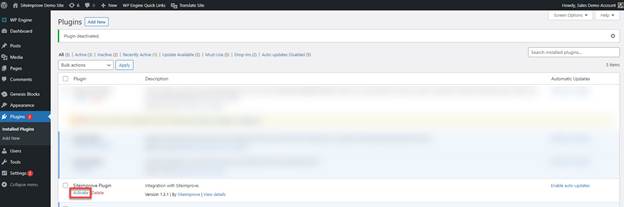
- After that, the plugin can be activated in one of two ways:
- Immediately, by selecting the 'Activate' button on the 'Add New' page.
- Selecting 'Activate' on the 'Installed plugins' listing page.
How to Configure the WordPress Plugin
- Once the plugin is activated a new menu option will show up on the left sidebar called 'Siteimprove.
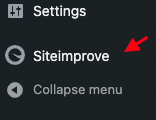
- To continue the plugin's configuration, the user should click on the 'Siteimprove' menu.
- Token: this field is filled automatically and should not be changed unless a new token is needed. Then if that’s the case the user should click on 'Request new token' to generate a new one.
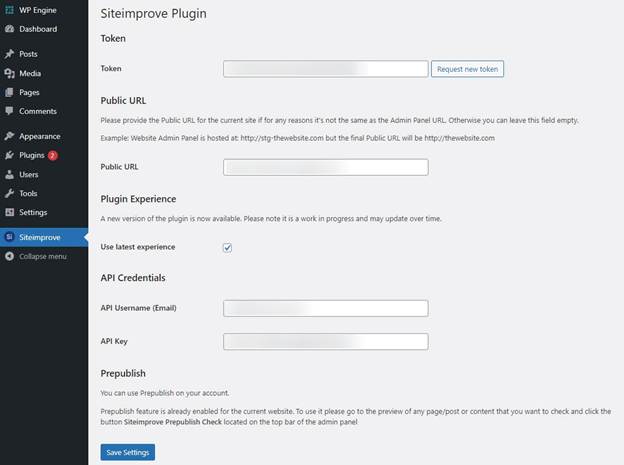
- Public URL (optional): should be used in the case that the admin of the website and the final version are located on different domains. For example, the WordPress CMS Editor is located at https://stg-thewebsite.com but the final domain, where the content is published be displayed to the public is located at https://thewebsite.com. In that case, the Public URL field should be https://thewebsite.com.
- Plugin Experience: you have the option to opt out of the latest version of the plugin by unchecking the checkbox next to ‘Use latest experience.’ See more about the latest plugin experience here: How to navigate the New Siteimprove CMS Plugin.
- API Credentials (optional): can be filled to use the Prepublish feature. You will need to create an API key following the instructions under How to connect to the Siteimprove API and have a Siteimprove subscription to Prepublish in order to use this feature. Contact Siteimprove if you have any questions regarding the subscription.
Note: It is recommended to create an API key for an generic user for this, with Account Owner or Administrator level permissions and access to the appropriate sites in the Siteimprove Platform, so that it doesn't change with updates to users and cause issues with accessing this feature in the plugin.
- After filling in the fields, select ‘Save Settings’ to save the settings.
- After configuring the plugin, someone with Account Owner level permissions in the Siteimprove Platform will need to log into the plugin and accept the plugin terms and conditions.
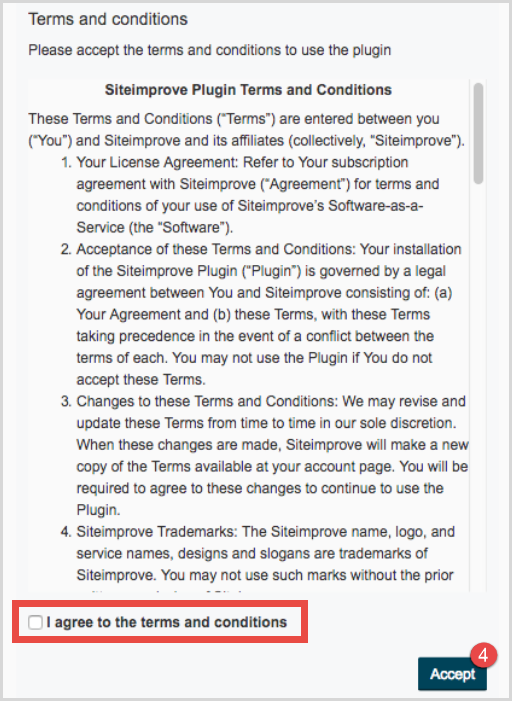
Note: You can also read the Siteimprove CMS plugin terms and conditions under Settings > Integrations > CMS Plugin Setup.
Next Steps
New Plugin Experience Usage
For usage information with the new plugin experience (with the ‘Use latest experience’ checked under the plugin configuration) follow the guide below.
How to navigate the New Siteimprove CMS Plugin
Old Plugin Experience Usage
For usage information with the old plugin experience (with the ‘Use latest experience’ unchecked following these instructions: How to Disable New CMS Plugin UI follow the guide below.
Did you find it helpful? Yes No
Send feedback